Resurfacing an Existing Concrete Slab: Process, Timeline, and What to Expect
If you have already decided to hire a contractor for resurfacing an existing concrete slab, the next questions are practical ones. How long does the work take? How long is the driveway or walkway out of service? What should be done before the crew shows up? This guide walks through the concrete resurfacing process timeline step by step, so you know what happens from prep day to the first time you drive or walk on the new surface.
Resurfacing applies a thin polymer-modified overlay to a slab that is structurally sound but rough, spalled, or worn on top. It costs far less than tearing out and replacing the whole slab, and it moves faster. That matters whether you are a homeowner finishing out a new build with one older section of flatwork that should match the fresh pours, or a property manager scheduling work around residents who need to use shared walkways every day.
Here is how the job unfolds in Salt Lake City conditions, step by step.
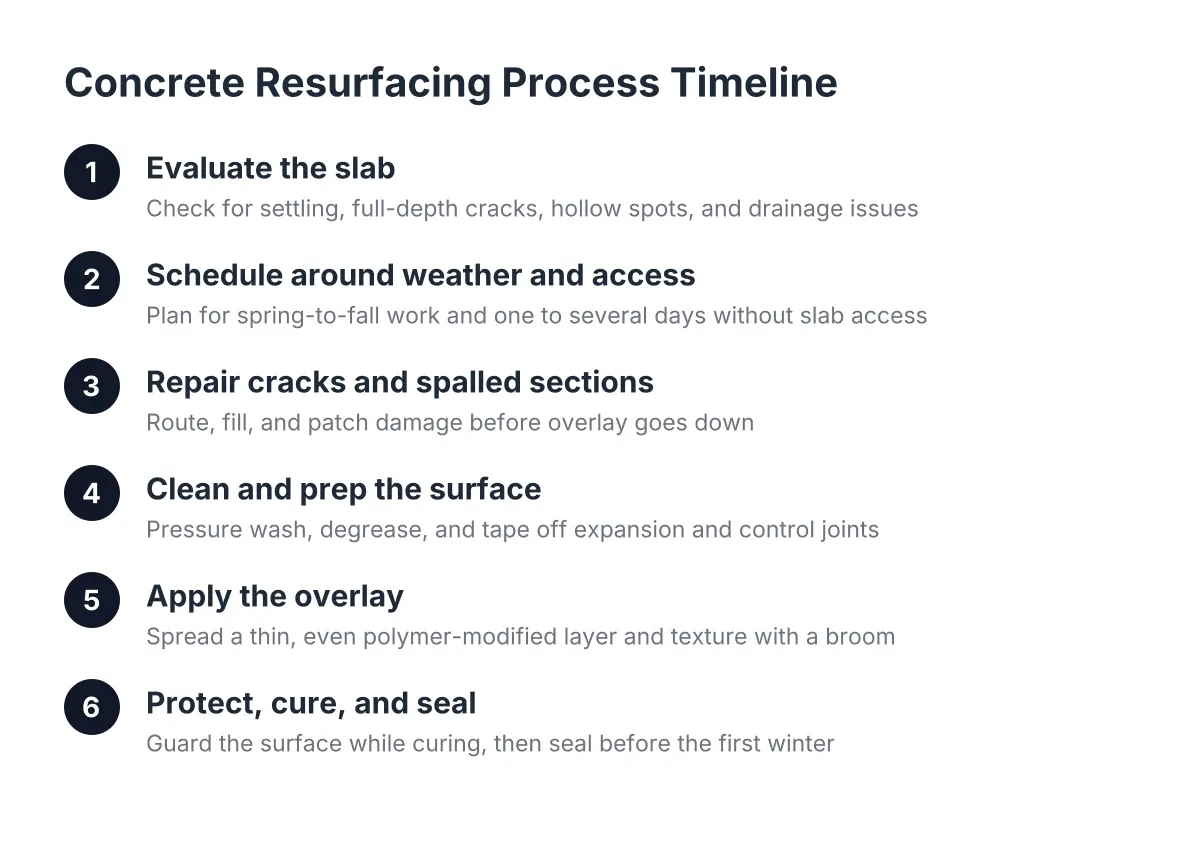
Understanding the Concrete Resurfacing Process Timeline
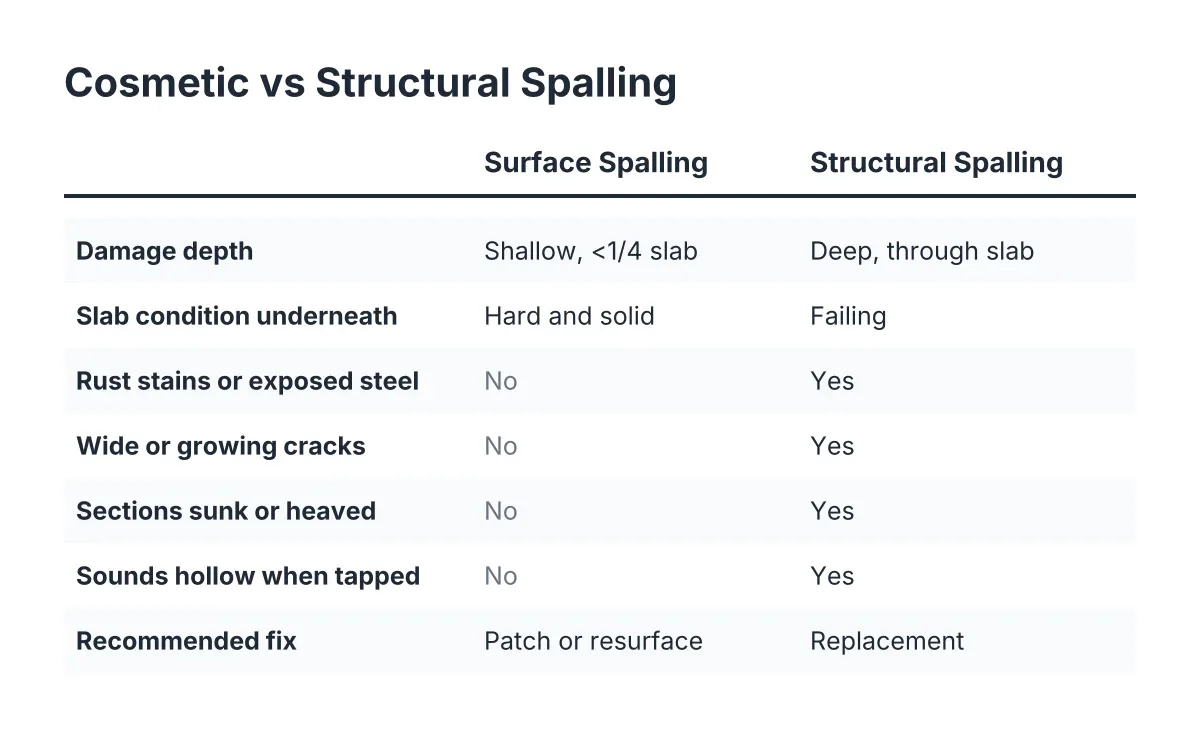
Before anything else, a contractor needs to verify the slab can be resurfaced at all. Resurfacing fixes surface problems: spalling, scaling, discoloration, and minor cracking. It does not fix structural problems. If the slab has settled, heaved, or cracked all the way through in multiple places, an overlay will crack right along with it.
Along the Wasatch Front, this check matters more than in milder climates. Hard freeze-thaw cycles and clay-and-gravel soils can move slabs over time. A good evaluation looks for:
- Sections that have sunk or lifted relative to each other
- Cracks wider than a hairline that run through the full depth
- Hollow-sounding areas where the slab has separated from the base
- Drainage problems that send snowmelt under or across the slab
If the slab passes, resurfacing makes sense. If it fails, you are looking at partial replacement or full tear-out, and it is better to know that before money goes into an overlay that will not last. This evaluation is one place where a professional opinion is worth getting even if you plan to handle other parts of the project yourself; a bad call here wastes the entire resurfacing budget.
Step 2: Schedule Around Weather and Site Access
Resurfacing material is weather-sensitive. It needs moderate temperatures to cure properly, so in Salt Lake City the realistic season runs from spring through fall. Hot July afternoons are workable but harder; direct sun shortens the working time of the overlay, so crews often shade the work area or start early. Freezing nights in late fall end the season.
Next, think about access. If the slab being resurfaced is your only driveway, plan for it to be unusable for one to several days. Park on the street or arrange alternate access before the crew arrives. For an HOA with shared walkways, this is the step where you notify residents, post dates, and decide whether the work gets phased so one route stays open at all times.
For new construction, sequence matters too. If other trades still need to roll equipment across the area, resurface last. Crews on full-lot projects often keep an old apron or adjacent surface intact as the access point until the end of the job for exactly this reason. Putting a finished overlay down and then driving a loaded truck over it two days later undoes the work.
Step 3: Repair Cracks and Spalled Sections First
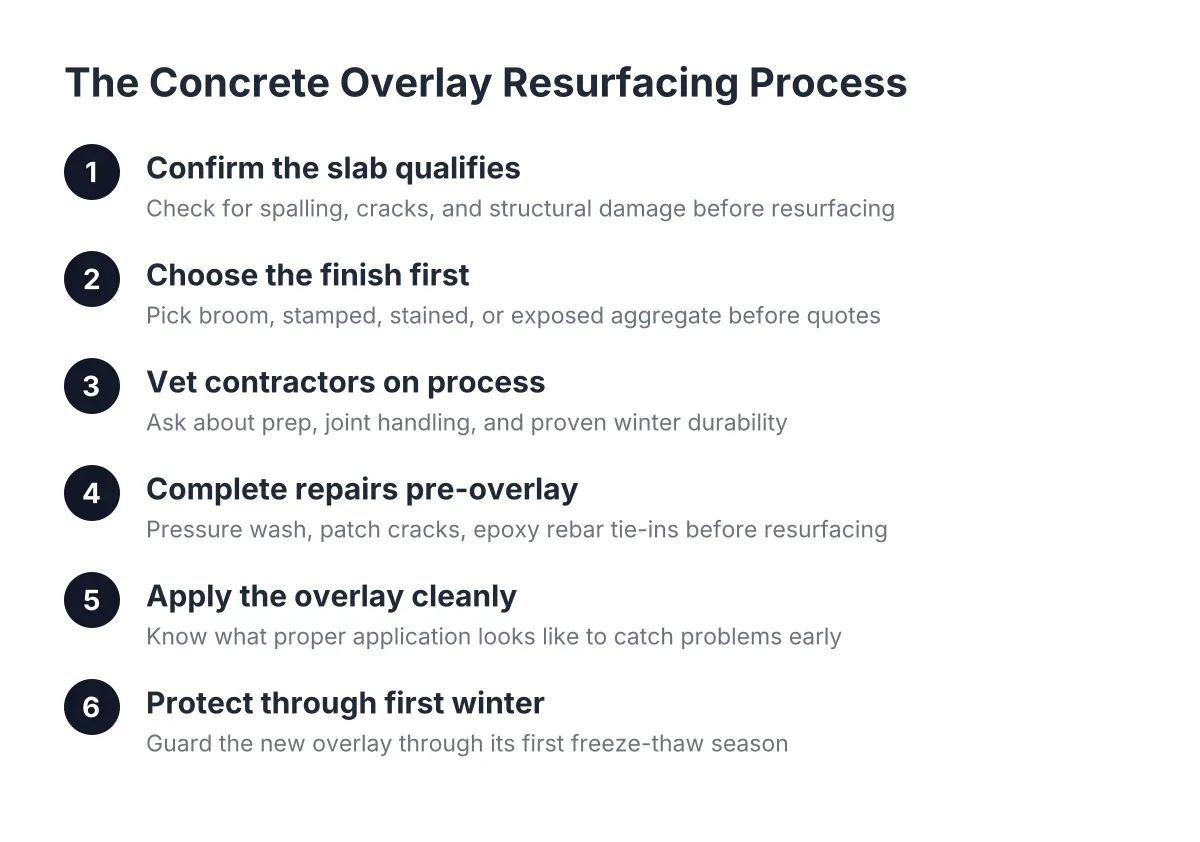
An overlay is only as good as what it sits on. Therefore, cracks get routed and filled, and spalled or delaminated patches get chipped out and patched before any resurfacer goes down. The concrete resurfacing process timeline accounts for these repairs, since skipping this step is the most common reason overlays fail early; a crack that telegraphs through the new surface in the first winter was a crack that never got repaired.
If you are searching for concrete spalling repair, understand that spot repair and resurfacing usually go together on the same visit. The patch fixes the damage; the overlay makes the whole surface uniform so the repair does not stand out as a gray rectangle in the middle of the driveway.
Expect this step to take a few hours to a full day depending on how much damage the slab has. Patching compounds need time to set before the overlay goes on top, which can add a day to the schedule on heavily damaged slabs.
Step 4: Clean and Prep the Surface
Resurfacer bonds to clean, sound concrete and nothing else. The crew will pressure wash the slab to strip dirt, oil, old sealer, and any loose material. Oil stains from a parking area may need degreasing or grinding; old sealers may need mechanical removal. On commercial lots and HOA driveways that have seen years of vehicle drips, this prep can take as long as the overlay itself.
In addition, this is when expansion joints and control joints get taped off. Overlay material must never bridge those joints. The joints exist to let the slab move with temperature swings, which Salt Lake City delivers in force, and covering them transfers that movement into the new surface as a crack. A careful crew masks every joint and respects the slab's original layout.
Step 5: Apply the Overlay for Resurfacing the Existing Concrete Slab
With the surface clean and damp, the crew mixes and spreads the polymer-modified resurfacer in sections, working it with a squeegee or trowel to a thin, even layer. Thin is the operating word. Applied too thick, the material gets gummy and hard to work, and visible ripples in the finished surface are the telltale sign it went down heavy.
Timing is tight during this step. On a textured finish, the broom has to hit the surface within minutes, before the material sets up and resists texturing. A broom finish is standard for driveways and walkways in this climate because the texture gives traction when the surface is wet or icy. For a patio, you might choose a smoother finish or a decorative concrete treatment instead.
Tape over the joints comes up before the material fully dries, with edges trimmed by trowel and blended with a damp sponge. Small details like that separate a surface that looks poured from one that looks painted.
For a typical two-car residential driveway, application itself usually takes a crew part of one day. Large HOA walkway networks get done in phases over several days so residents keep a clear path.
Step 6: Protect the Surface While It Cures
The overlay sets up fast but gains strength slowly. As a general pattern, foot traffic is possible within hours to a day, and vehicle traffic needs to wait several days. The concrete resurfacing process timeline shows that your contractor will give timelines specific to the product and the weather that week; cool fall days stretch cure times, and warm dry days shorten them.
During this window:
- Keep cars, trailers, and equipment off the surface entirely
- Keep sprinklers from soaking the fresh overlay
- Block pet and foot traffic for at least the first day
- Hold off on de-icing products until the surface has fully cured, ideally through its first season
For a property manager, the practical move is to put the cure window in the resident notice up front. Say a 40-unit community resurfaces its main entry walkway on a Tuesday; in that scenario, the notice would route residents to a secondary path through Wednesday, with the walkway reopening Thursday and vehicles kept off any resurfaced drive aisle until the weekend. Planning that in advance prevents one impatient delivery truck from ruining the finish.
Step 7: Seal and Set Up for the First Winter
A sealer applied after curing protects the new surface from water penetration, and water is the enemy here. Freeze-thaw cycles drive most of the spalling that made the slab look bad in the first place; water soaks in, freezes, expands, and pops the surface. Sealing before the first winter, then resealing every few years, is the maintenance habit that makes resurfacing an existing concrete slab last instead of becoming a repeat project.
Also look at where snowmelt goes. If a downspout or a low spot keeps one section of the slab wet, fix the drainage now. The best overlay in the valley will not survive sitting under refreezing water every night from December through February.
What the Full Timeline Looks Like
Pulling the steps together, here is a realistic calendar for a straightforward residential project:
- Evaluation and estimate: one site visit
- Crack repair and spalling patches: half a day to a full day
- Cleaning and prep: half a day
- Overlay application: half a day to a full day
- Cure before foot traffic: about a day
- Cure before vehicles: several days
- Sealing: one short visit after full cure
So the disruption window for a driveway typically runs under a week, with the crew on site for only two or three of those days. Larger commercial or HOA projects stretch longer but phase so no area is closed for more than a few days at a time.
Cost follows the same drivers as other flatwork: square footage, how much repair the slab needs first, the finish you choose, and how easy the site is to access. Resurfacing avoids demolition, haul-off, and new base work, which is why it runs well below replacement for a slab that qualifies. When you compare bids from concrete resurfacing contractors, make sure each bid states what repair work is included before the overlay; a low number that skips crack repair is not a low number, it is an incomplete scope.
Done right, resurfacing an existing concrete slab buys years of clean, uniform surface for a fraction of replacement cost, with days of disruption instead of weeks. The keys are an honest evaluation up front, real repairs before the overlay, respect for the joints, and patience through the cure.
If you need concrete repair and resurfacing, Salt Lake Valley Concrete can help.
Prefer to talk it through? Call (385) 433-4634 — a quick call is usually the fastest way to get a straight answer for your situation.